简介
该指南将拆开任天堂3DS XL,来露出主板,然后找出IR板,以便更换其。
你所需要的
-
-
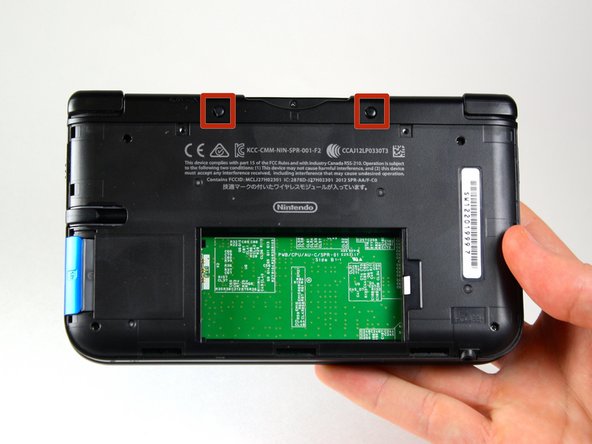
握住设备,使盖子朝上。
-
使用塑料打开工具,从右上角开始撬开盖子。
-
握住盖子的边缘以确保卡扣不会重新意外连接。
-
寻找手写笔隔层下面的小部分。 如果仍然固定着,请撬开盖子。
-
取下设备的盖子并放在一边。
Note that on the lower side (opposite to the hinges), there are small hooking tabs. These require you to lift the top (screw side) off towards you, then the lower area.
-
-
-
在电池右侧的缺口处插入塑料打开工具。
-
将电池从底壳中撬起。
-
从外壳中提起电池将其放置一边。
My 👴 grandpa was helping me 🔧 repair my 3ds xl and ⚡️electrocuted himself with the 🔋battery while we was taking it out with a 🔪 knife. 💀 Rip grandpa 😔
-
-
-
在顶部游戏插卡槽的位置两边使用镊子将两个橡胶垫取出。
I found that the rubber bumps don't move easily, you'll likely have to use a lot of upward force to move them.
jconnell85 - 回复
I torn one of the bumpers because I used a needle instead.
You do have a pry a bit. I tore one a little but not that big of a deal.
try twisting upward
Kmi Nguyen - 回复
My 3DS XL is so old that the rubber bumpers were very hard to remove.
So I tried to heat the rubber bumpers a little bit with a hair dryer for 15-20 seconds, with some pauses every 5 seconds in order to avoid overheating or damaging something as a precaution.
It worked well to remove them but the only drawback is that as my rubber bumpers already got damaged and scratched because of my previous attempts without heating first, heating it up after aggravated the scratch damages when I used tweezers.
So I would recommend heating the rubber bumpers moderately first and be gentle when using something that could scratch or damage them.
(Do not take my words for it, it may not work for you)
S. Tony Ly - 回复
I was able to remove mine that were being very difficult with some dull tweezers. I used dull ones because I didn't want to scratch anything. First I wedged it between the plastic and the bumper, wiggled it a tiny bit, pulled it out, wedged it again in another spot and continued this until I got it out with my fingernail. Neither the bumper nor my shell were damaged.
-
-
-
-
使用#00十字螺丝刀卸下6颗 6.2mm 螺丝。
#000 ifixit philips screwdriver does not fit the 6.2mm screws. Whats the deal?
I have a 000 Phillips from tekton and it worked just fine.
Megan -
I stripped a good #000 screwdriver, and found that EVERY screw actually fit perfect and snug with a #00 screwdriver. Zero damage to the screws or the screwdriver with the #00.
I bought and used the #00 screwdriver, and it worked perfectly for this.
I had also bought the #000, but I never needed it during the entire operation.
jconnell85 - 回复
All 6 screws are exactly the same so you don't have to worry about mixing them up.
One of the screws in my 3ds XL seems to have its '+' engraving worn off, i can't seem to unscrew it, though the other 5 unscrewed properly. What should I do?
Potato Man - 回复
I stripped a screw in my 3ds xl and don’t know how to get it out. Do I have to use a drill or is there another way?
-
-
-
使用#00 十字螺丝刀来卸下一颗位于游戏插卡槽顶部的2.3mm螺丝。
between these two steps, the bottom two screws are not mentioned. make sure to take those out too ;)
-
-
-
使用塑料打开工具从底部边缘位置开始环绕一周来撬开底壳。
-
两条排线将壳子与电路板相连。 小心不要用力拉动壳子和排线。
Make sure that you have removed your SD card, otherwise that'll keep you from completing this step.
jconnell85 - 回复
-
-
-
使用塑料打开工具来拆下位于左右缓冲垫两边的排线电缆底座上的线缆。
-
完全地将底壳从设备上移走,放到一边。
Thank you so much for pointing that out, it was keeping my system from starting up and I thought I blew it!
Yup, that is definitely an upside-down IR board, and will result in a silent post error. It was driving me crazy trying to figure out why the system wouldn't start up.
That's it!! Thanks so much!! I've tinkered around about one month and couldn't get this thing to work...all because I've followed the guide here and looked the picture up twice so I don't put the IR-Board in the wrong way...
Thank you guys so much! I followed everything faithfully and it was DOA on startup. (Black screens, blue light). The IR board was backwards. These pictures need to be fixed. As-is, it shows a broken 3DS.
You should always work on the device in a 3/4 open position- this allows the ribbon cables to have slack and will less likely tear, and is the only position the hinge pin can be removed or installed as it is keyed
-
-
-
使用塑料打开工具撬出遥杆。
-
使用塑料打开工具时切勿过度用力。 这里遥杆任然与主板通过线缆连接。
I found it easy to put my finger ontop of the board and apply a little pressure. When i popped off the board, my finger stopped it flying off.
I made a small mistake by popping the circle pad joystick and it went flying off and now im stuck trying to put it back in
-
-
-
使用撬棒扁平一端来将连接到主板上的排线撬起。
-
取下排线和遥杆。
The 'flat head' holds it in place when down, and you can reattach your ribbon cable when it's up, it only needs to be partway in so when you close the flat head, if your joystick board can't move easily in place then you've done it right, it it's too loose, try again to work the ribbon cable under.
jconnell85 - 回复
The ribbon goes into the left side of the "flat head" right? Not the end that clamps down on the right? I'm having a !&&* of a time sliding the end of the ribbon into the little space between the flat head when it's up and the side of the terminal.
For those of you like me, who got stuck after the last step.
To understand how to actually remove the circle pad, continue with these steps at 21.
Nintendo 3DS Circle Pad Replacement
Hope it helps those after me. I almost ripped some cabling inside thinking I had to take out the motherboard.. luckily I didn't.
Just as what monk333y said, follow the Original 3DS steps. They are identical and you don't have to remove anymore big parts. The only annoying part is taking out the circle pad.
I broke the retaining clip. It is not very strong and I used a bit too much force i think in opening the clip or pushing it back down. Thinking of using hot glue or something else to keep the circle pad ribbon in place.
Did the hot glue work? I did the exact same thing now im not sure what to do…
When testing the touchscreen, make sure you install the analog. Otherwise, the screen will act erratic. Thought I broke a brand new part. Just a heads up!
The entire top part of my circle pad had broken off, so I had no problem getting the old one out. I actually had more trouble getting the ribbon cable back into the clip, and the new circle pad attached to the stick, than any other part.
That said, this was way, way easier than I expected it to be.
-
-
-
放置设备,使得游戏插槽位于顶部。
-
找到位于主板右上方的红外板。
-
通过使用塑料打开工具插入IR板下面轻轻地撬起,来卸下IR板。
One assumes they forgot to take the photo before removal and quickly put it back on upside down (accidentally) for the purposes of taking the photo.
Removing the IR board is actually a completely unnecessary step. It's absolutely fine to leave the IR board attached to the motherboard, it's then one less loose piece to go missing ;)
The reason they remove these "easily loosable" pieces is because there's an order to put the board back together or the 3DS won't turn on. This is for replacing the motherboard, which most of the time you will buy and it won't come with the microphone, volume or IR board. Use your head kiddo. If it's so easy to loose these pieces, you should keep better track of them. We might as well just not take out any screws as well because those are very easy to loose
You should add this note to the other uses of this picture; I accidentally knocked that chip off and reinstalled it upside down. I was referencing the photos for replacing the joystick.
You skipped removing the microphopne.
I agree my 3dxl the IR board is also part of the motherboard and doesnt come off.
-


要重新组装您的设备,请按照本指南的相反顺序进行操作。
要重新组装您的设备,请按照本指南的相反顺序进行操作。
11等其他人完成本指南。

团队

Cal Poly, Team 9-13, Regan Spring 2014 Cal Poly, Team 9-13, Regan Spring 2014 的会员
CPSU-REGAN-S14S9G13
5 名成员
创作了44篇指南
4条评论
This guide was really helpful, I had to teardown my 3DS to remove a rice crispy that was stuck in the SD card reader, I don't know how it got there, I wasn't even eating cereals
was removing the analog stick really necessary?
8bitlooser - 回复
So I have an original 3DS and a 3DS XL the 3DS Xl Works great but the 3DS won't turn on. I believe it is because I t has a missing IR Board. I am hoping to use the one on the 3DS XL. Do you think it will work?they look similar in the pictures..... Anyway I am confused as to why I have to take out the cirlepad??
AppleTopic - 回复
if you are missing ir board the system will not boot?
Note: If your top or bottom screen was working before disassembly and doesn't work after reassembly, then it's likely that the connector is loose or dirty or damaged or not clipped or PLACED UPSIDE-DOWN. I had this issue with my Super3DS XL(2015) and it turns out that the reason why my top screen wasn't working after put together, was because I had the top LCD connector upside-down. After I correctly put the connector in, It worked again!
justjustintuber - 回复
what type screwdriver do i use?!? its so small!!!!
Matthew - 回复
I had success using a #00 Phillips head
Jake S -
Can't clip the front of the back cover back in
Macro Man - 回复
I had trouble too, but got past it by slipping the bottom edge into the three indents first then easing the rest of the cover on!
Issu -
I found these were actually #00
Demosthien - 回复
The screws in the 1st picture are stripped. What screwdriver head do I use?
Adric101 - 回复