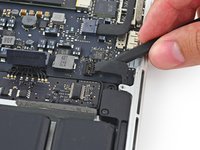
跳转到主内容

交换MacBook Pro 13" Retina显示器2015早期版本的左侧扬声器

你所需要的

  1. 交换MacBook Pro 13" Retina显示器2015早期版本的左侧扬声器, 背板: 步骤 1 中的图像 1,1
    在这个步骤中使用的工具:
    Magnetic Project Mat
    $19.95
    购买
    • 拆下以下10个固定在上壳体上的螺丝

    • 两个 2.3毫米 的梅花五角螺丝

    • 八个 3.0毫米 的梅花五角螺丝

    • 在本次维修中,要对每个螺丝做好记录以便准确装回,避免对设备造成伤害。

  2. 交换MacBook Pro 13" Retina显示器2015早期版本的左侧扬声器: 步骤 2 中的图像 1,1
    • 把你的手指放在上下壳体中间

    • 轻轻地把上下壳体拉开

  3. 交换MacBook Pro 13" Retina显示器2015早期版本的左侧扬声器: 步骤 3 中的图像 1,2 交换MacBook Pro 13" Retina显示器2015早期版本的左侧扬声器: 步骤 3 中的图像 2,2
    • 上下壳体中间有两个塑料卡扣相连

    • 在组装期间,温柔地从中间推下机壳,重新扣上这两个塑料卡扣。

  4. 交换MacBook Pro 13" Retina显示器2015早期版本的左侧扬声器, 电池连接器: 步骤 4 中的图像 1,1
    • 如有必要,可拆卸粘在电池接触板上的塑料盖。

  5. 交换MacBook Pro 13" Retina显示器2015早期版本的左侧扬声器: 步骤 5 中的图像 1,2 交换MacBook Pro 13" Retina显示器2015早期版本的左侧扬声器: 步骤 5 中的图像 2,2
    • 用撬棒的平端,将电池连接器从主板插座上直着往上撬起。

    • 确保您只抬起了连接器本身,而不是插座,否则您可能会对主板造成永久性的损坏。

  6. 交换MacBook Pro 13" Retina显示器2015早期版本的左侧扬声器: 步骤 6 中的图像 1,1
    • 在维修过程中,将电池连接器弯曲,以防止意外接触其插座。

  7. 交换MacBook Pro 13" Retina显示器2015早期版本的左侧扬声器, 左扬声器: 步骤 7 中的图像 1,2 交换MacBook Pro 13" Retina显示器2015早期版本的左侧扬声器, 左扬声器: 步骤 7 中的图像 2,2
    • 将撬棒头部插入连接器附近的左扬声器的线缆下,轻轻撬起,使其从主板上脱离。

  8. 交换MacBook Pro 13" Retina显示器2015早期版本的左侧扬声器: 步骤 8 中的图像 1,1
    • 将固定左扬声器的几颗螺丝拆下:

    • 一颗 5.7 mm T5 Torx螺丝

    • 一颗 6.5 mm T5 Torx螺丝

    • 一颗 3.8 mm T5 Torx螺丝

  9. 交换MacBook Pro 13" Retina显示器2015早期版本的左侧扬声器: 步骤 9 中的图像 1,3 交换MacBook Pro 13" Retina显示器2015早期版本的左侧扬声器: 步骤 9 中的图像 2,3 交换MacBook Pro 13" Retina显示器2015早期版本的左侧扬声器: 步骤 9 中的图像 3,3
    • 向上提起左扬声器,绕着电池取出,以便将其从上盖中取出。

    • 小心不要将扬声器电缆挂在侧面的螺丝孔柱上

结论

若要重新组装你的设备,以逆序方式执行这些操作。

52等其他人完成本指南。

由衷感谢以下译者:

en zh

100%

Yiyang Zhao正在帮助我们修复这个世界! 您也想加入吗?
开始翻译 ›

团队

iFixit iFixit 的会员

Staff

136 名成员

创作了16,560篇指南

4条评论

Does anyone know the RMS/wattage of the speaker?

mannankhanna14 - 回复

Excellent clear instructions. On my MacBook the cover screws were marked on the threads with white for the long ones and blue for the short. Since I couldn’t source a replacement speaker I repaired the existing one using contact glue as described by Earl Maliki on YouTube…it works; no more rattles. The sound is now lo-fi for the left speaker but good enough for speech and I never listen to music without a Bluetooth speaker. Total cost: 24 Swiss francs for a screwdriver set with a P5 pentalobe head. Much better than the 167 fr and 2 weeks in the shop I was quoted locally for repair.

Andrew Matus - 回复

Hi there,

thank you for the detailed instruction. Used it to replace rattling speakers in a “customer” laptop (I work in the Repaircafé in Bern, so not a commercial operation).

Cheers, J.

Jochen Bergmann - 回复

Very easy to follow instructions, the screw ID's were the biggest help, since Apple loves to rummage in their toolbox for a different one for each hole. Had a bit of trouble re-installing the speaker due to speaker cable being 'new', but with a bit of patience I got it to lie flat.

Kaitengare - 回复

添加评论

浏览统计数据:

过去 24 小时: 14

过去 7 天: 98

过去 30 天: 524

总计 38,478