视频概述
-
-
在三星的宣传影片中,您应该看到了三星Galaxy S8 +光滑而圆润的外观,但我们会进一步深入。 本次拆解的机器配置为:
-
6.2英寸双曲面,2960x1440分辨率的Super AMOLED屏幕(529 ppi)
-
高通骁龙835或者三星 Exynos 8895处理器,4GB内存
-
1200万像素后置摄像头,支持双像素自动对焦,录制4K视频,800万像素前置摄像头
-
64GB的闪存,支持额外的MicroSD卡(最高支持256GB)
-
IP66+IP68级防水防尘
-
安卓7.0系统
-
-
-
底部的端口包括:耳机插孔,USB-C接口,麦克风以及扬声器栅格。
-
前面是光滑的,几乎没有特色 - 物理主页按钮已被置于显示器下方的压力传感器代替,使其成为一个真正的整体设备。
-
最后,需要频繁更换SIM卡的用户注意:在三星Galaxy S8 +顶部有两个高度相似的开口。 一个是您的SIM弹出孔,另一个是麦克风。 不要将那两个开口混淆。
Samsung went with easier solution in regard of fingerprint reader because synaptic did not finish developing the on screen sensor; while they are under pressure to release a new flagship in a rather empty market for them after the Note 7 fiasco.
I would love to understand the damage (especially to the IP rating) that may have been caused by pushing the sim ejector through the top mic hole.
-
-
-
...但是,对于我们所有的谈话,这个后面板确实表现出了一些新的东西。 指纹传感器固定在后面板,其电缆很短,并且安装在主板上。
-
三星设计这款电缆可以通过后面板安全地拉出来。 电缆几乎没有松动,面板的最厉害的地方在将电缆从其微小的弹出式连接器上拔出。 这使得我们以前见过的某些指纹传感器电缆的损坏明显减少。
-
有线电缆发出后,我们已经把玻璃后盖移除。 三星Galaxy S8 +和三星Galaxy S8跟随三星Galaxy S6移动到玻璃后盖。 这种设计节省了三星的工程设计,避免以牺牲耐用性和可修复性为代价。将天线集成到金属后盖的手机中。
-
当它在评价可修复得分时,两倍摔碎的可能性和这个拆解不会帮助它。
What is the fingerprint reader made from this year? The S7 fingerprint reader in the home button was prone to scratching and peeling last year. Is the fingerprint reader covered by glass this year in the S8 and S8+? Very curious to know as I like things to last and wear well.
-
-
-
-
随着拆解中框,事情看起来非常类似于三星Galaxy S7和三星Galaxy S7 Edge。
-
这一次,上层天线组件与NFC /无线充电面板组合,类似于在三星Galaxy Note7上。
-
-
-
-
我们取出一个主板,准备拆卸相机。
-
索尼的背面/主摄像头已经由旧版“Hero”更换为“Dream1” 标签。除此之外,这就是与三星Galaxy S7 / S7 Edge相同的摄像头硬件 - 三星已经完善了软件,没有什么了不起的。
-
接下来,我们要拆解前置摄像头和一个虹膜传感器,以前在三星Galaxy Note7上面见过。
The image sensor is also different. Being an IMX333. On top of that the ISP has been upgraded. Far from just "sofware improvements, nothing more" I could tell the moment I took a RAW photo on both using 500 iso. Despite using RAW, bypassing the jpeg processing, the S8 image was noticeably less noisy with much less color blotching
-
-
-
我们将相机放在一边,以便取下覆盖该主板的硅片。 我们的研究结果包括:
-
三星K3UH5H50MM-NGCJ 4GB LPDDR4覆盖在 MSM8898 骁龙835 CPU上面
-
东芝THGBF4G9N4LBAIR 64GB UFS(闪存+控制器)
-
高通Aqstic WCD9341媒体解码器
-
Skyworks 78160-11
-
安华高AFEM-9066
-
-
-
在另一面:
-
高通WTR5975 RF收发器
-
村田KM6D28040 WIFI模块
-
安华高AFEM-9053
-
高通PM8998(类似于PM8920)
-
恩智浦80T71 NFC控制器
-
-
-
现在,我们拆解I / O子板。 这里有许多防水设计,包括扬声器栅格上面,USB Type-C接口和耳机插孔上的微小密封。
-
耳机插孔本身仍然是一个模块化的事情 - 可修复性的好消息,因为这是高磨损组件。
-
可见这也是一个垫片的组合,这帮它助获得手机IP66+IP68评级。 耳机插孔,USB-C接口和扬声器栅格具有一些完美的防护。
Is the voltage regulator on the daughter board?
My S8+ indicated moisture when I plugged in the charging cable, the next day it did not but It will not take a charge. Even wirelessly. So I think it is the voltage regulator that is fried. If it is on the daughter board I can pillage one from another Google Locked phone and fix mine.
You think this will work?
-
-
-
在看到热管和接触垫按钮电缆后,我们从手机中抽出了几个小东西。
-
取出我们的老款震动电机
-
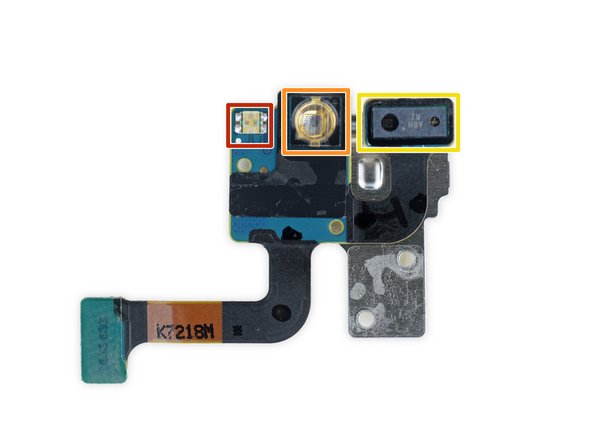
此外,还有漂亮的传感器阵列(含湿度指示器):
-
RGB LED(大概是)
-
红外发射器(用于进行光线强度测量)
-
红外摄像机(大概是)用于脉冲读数,也可能是距离传感器
I thought the IR camera/emitter on the front should be part of the iris scanning system and not pulse reading
Exactly. Yellow is the proximity sensor, orange an IR LED for the iris scanner and red the notification LED, as stated.
Not as stated, the description says it's for illuminating fingers for pulse reading,,,
djlobb01 -
-
-
There is a force sensor..hope everybody can see it which connects to the display/timing/touch controller board
This interests me most.... So there is no pressure sensor at all?? How does the S8 register a home button "press" without any kind of pressure pad/sensor?
A pressure sensor isn't needed, it just needs to see how big an imprint your finger is making as the harder you press, the bigger the contact area is on the screen
that seems like a conductive layer beneath with a sponge covering. this could be a force sensor.
-
-
那就是三星Galaxy S8 +。 如果你仍然渴望更多的拆解,那么去看我们对标准版三星Galaxy S8进行的拆解的。
-
同时,现在是给这个手机的可维修性评分的时候了。
Hiya!
I was wondering if you guys could maybe do a comparison?
1) like the SD835 vs the A10 size.
2) volume of battery on S8 vs iphone7
3) size, efficency and density of the two motherboards (i think iphones is much smaller)
4) size and effectiveness of the two vibration motors (since S8 seems 1/3 the size)
4) also could you compare the two speakers (S8 and iphone7) against the and dual front speaker moto phone?
I ask because once again I am under the impression that the moto speakers are 1/3 the size of the main speakers in the two leaders and the same size as the ear speaker on the two.
5) and also maybe the effectiveness of the hydrophobic coating on the moto phones vs the two leaders?
6) and finally compare their internals density and effeicency to the Xiaomi Redmi 3s (because as far as I know, that is the smallest 5inch phone with a 4000mA battery)
I think that would be a really cool and enlightning.
love your work guys.
cheers.
-


32条评论
Hi: the breakdown exercise did you get a positive id on who is providing the USB-C controller chip? Thx!
I don't like glue on the battery and its not just that its the same capacity as we already see on the Samsung Galaxy S7 its kinda sad.
Man i now i will probably wait for one plus 5 or next google device because these two have big support on XDA community and they have regulari updates.
OnePlus are great with updates. My friend had Nougat on his OnePlus 3 before any of the leading phone makers (excluding Google Pixel obviously).
djlobb01 -
The S8/S8+ use a Sony IMX333 or Samsung S5K2L2 up from the IMX266 S5K2L1 found in last year's S7/S7E.
Thanks as always, guys. I seem to miss the speaker, though. Is it under the light gray grille?
Ah, ok. I see. It is the component in the lower midframe (https://d3nevzfk7ii3be.cloudfront.net/ig...).
Do you know how the home button works since there's no pressure sensor?
Does it have a separate "taptic engine" or uses the same vibration motor?
Thanks.
It likely works by measuring the surface area of the finger placed on the screen. When you press harder to activate the virtual button your finger will create a larger surface area on the screen which can be measured as more force being applied.
Leo Best -
Because samsung opted for Toshiba UFS storage if they also manufacture UFS storage
Why would you expect to find a pressure sensor behind the displyay? The screen does not deform, the digitiser just has to look for the contact patch of your finger getting bigger as you press harder on that area.
Open the Samsung Dex Dock as well!
mjpineda94 - 回复
Are the s8 and s8+ motherboards the same?
Photos [|3]
Hi, could you see a photo in high resolution, how is the earphone hooked? The frontal bone, I get curious about how it is maintained and how it is, and if it could sink without meaning to. Thank you
Do you mean the earpiece speaker? It can be seen in this photo, the last photo in step 6, at the top of the phone. It is adhered to the case and connected via spring contacts to the back of the motherboard. The speaker grille can be seen in this photo, the second image on step 13 at the top of the phone.
Can someone tell me what type the 14 Phillips screws used to hold down the NFC antenna, charging coil, and loud speaker? In addition, what are the 5 Phillips screws used to hold down the charging port PCB?
accidently I entered the ejection pin in the bottom mic.hole in S8 please advise if I already damaged the mic and/or the water resistant sealed?
I want to share my experience with you all.
We at HiGenius.nl fix smartphones all the time like Samsung S8 Plus too. unfortunately i did not see in this video that the sim tray is different than ever before. This because the tray is attached at the back of the board. So dont be surprised while you see this for the first time. Just be very cautious while removing the board. it wil follow so don’t worry.
I recently disassembled my Samsung galaxy s8 Plus the other day to replace the usb-c port as it would no longer lock in the charging cable.
However upon putting it back together and re-inserting the SIM card, it can no longer connect to my network provider. I get no mobile data or cell reception at all. However Wifi connections still work.
I was wondering if you may have an idea at what piece, board ect may play a role in connecting to the network.
The SIM works fine in another samsung phone that I previously used, so it is definitely hardware.
I’ve done network setting resets, WiFi calling is not on, and ive factory reset.
Sort of wishing I just bought a wireless charger at this point…
Thanks,
ZL
Something like that happened to me with an ASUS phone, the cause of the problem was that I did not properly connected the antenna (it was a little loose).
Hops this helps!
My galaxy s8 replaced screen isn't black what other part do i need to buy
The pictures don’t match what is received for the Galaxy S8+. It’s also not clear where to attach the perimeter adhesive. On the lip of the back cover or just inside the well area. In addition, after exposing the adhesive (after removing the clear side), no matter how weel you pre-align the position, you can’t count on the adhesive to stick to whichever method questioned above, without some of it not releasing cleanly from the colored backing. Yes. firm pressure was applied before moving a little further down. At times the adhesive stuck so strongly to the colored backing, it stretched the adhesive out of shape.
I have repaired hundreds of laptops and all in ones, so I understand there are subtleties in a repair, and I found it quite confusing replacing the battery and fingerprint sensor and other necessary parts related to doing that repair with the either inaccurate, outdated, or lack of detail provided (but much needed) in this guide.
can i buy motherboard for samsung galaxy 8plus scv35
hhera,n - 回复