简介
依照这份指南来更换三星盖乐世S7 Edge的屏幕组件。
这份指南会指导你在保持手机框架、逻辑主板和电池处于原貌的情况下更换屏幕组件。
注意:有一些这个手机的替代屏幕是被预先装在一个新框架里的(也就是底架),这就需要你移植你手机里所有的内部元件然后重装一个新电池。在你开始遵照这份指南行动前确保你拥有正确的元件。
如果框架损坏或弯曲,那么必须换掉它,否则新的屏幕可能不能正确地安装好而且可能会因为压力不均而受损。
从框架上分离屏幕的过程通常会毁坏屏幕,所以除非你决定了要更换屏幕,否则不要依照指南行动。
你所需要的
-
-
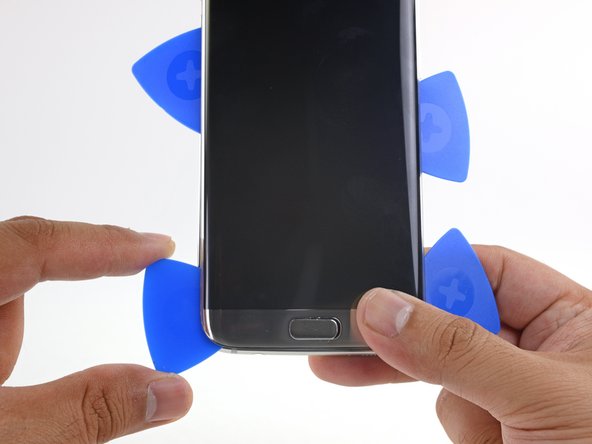
用手摸背板已经热了之后,在版面上靠近已加热的边缘处安装一个吸盘,越靠近越好,但要避开曲边。
-
抬起吸盘并且在玻璃板缝隙处放入一个撬片。
Suction cup does not seem to work.
Makes it sound ridiculously easy, when in reality you have to be pulling with tons of force while also holding the phone down and on top of that you have to insert the pick in a relatively small amount of time.
I was getting no where with the iOpener and picks alone, so I followed a YouTube video and used the iOpener as well as a hairdryer. I had to make the first cut in the ahesive with a utility/razor knife, then as soon as I was through the first part I inserted the plastic picks. The back of the phone has to be too hot to touch, ideally all around, so the iOpener alone is not enough.
Mark Frost - 回复
Thanks for the above comments. I was also getting nowhere with the iOpener then used a hairdryer on the non-camera end until it was hot to the touch and managed to get a Stanley knife into the gap and lifted enough to get a pick in. Plain sailing from there with patient heating and working the picks in to cut the glue. Eventually success and the back came off.
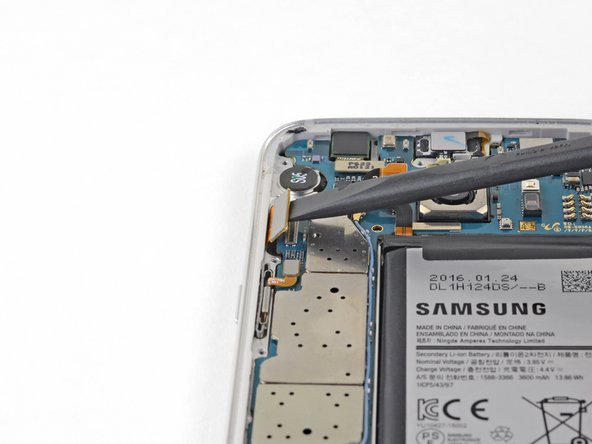
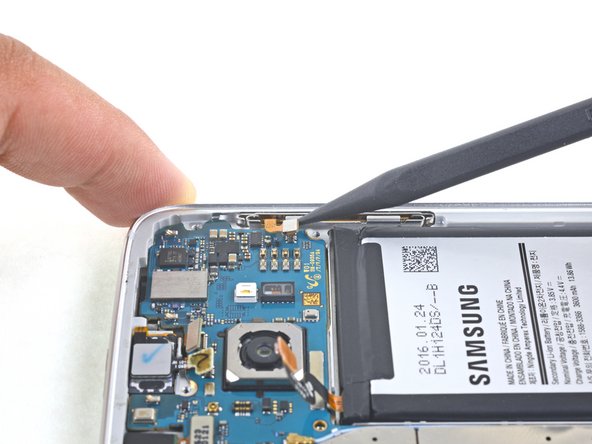
-
-
-
-
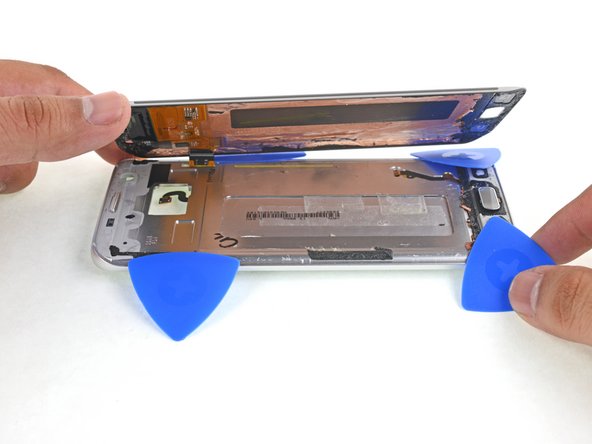
从中部框架抬起屏幕组件,仔细把屏幕线缆从中部框架的洞中拔出。
-
移除屏幕组件。
-


倒叙操作指南来重新装好你的设备。
倒叙操作指南来重新装好你的设备。
127等其他人完成本指南。


38条评论
Excellent guide, really enjoyed following the instructions. A job well done :-D
There is no fool proof method. Apply liberal amounts of heat. Be careful when slicing near the corners. If your back has micro-fractures already, chances are your back will crack along the fracture.
No matter how long I try to heat the back panel with an iOpener, I cannot seem to get the glue warm enough… Any advice on how to better unglue this thing?
Hi Jérémie,
The glue is pretty strong on this phone. You can try using a heat gun if you have one, or a hair dryer. You can also try the bottom edge instead of the long edge- sometimes the glue is not as strong there.
You should buy a hot plate with digital temperature adjustment which they use to separate LCD from glass.
The hot plate gives even heat to the surface of the phone incomparison to using a heat gun you cannot check how much heat it gives and you get uneven hot and cold spots.
Recommended temp around 85 degrees centigrade and use an i opener to create an opening and get a plastic pry card and coat it with alot of isopropyl alcohol and slide around the edges whilst adding more alcohol to the card
I only use a head gun with samsung phones because they have an impressive amount of stick to them. Just be careful not to over heat the back or front because then the glass will start to actually separate from the back plate and then it gets odd bubbles that are melted plastic and paint
Tom -
Force…. And tlc…lol
Hi Arthur, thanks for your feedback. I’ll give the iOpener another shot and if it doesn’t work I’ll use a hair dryer.
I’d like to see a picture and/or more detail about the capacitive buttons and how to detach them. I assume this was done in step29?
To clarify the question above… Step27 refers to “the button”. I assume that means “the right capacitive button”. Then in step28, the left capacitive button is separated from the display and perhaps in step29 the home button and the button cable are separated from the display? Or do you wait until step29 to do all of the buttons with the two corner picks in place?
Hi Susan,
You are correct: step 27 refers to the right capacitive button, 28 refers to the left, and 29 refers to the home. Take a close look at the two images in step 30. They show what you are cutting through in terms of capacitive buttons.
Thanks. Last question. If I just want to replace the display LCD and glass, do I really need to take the back off (steps 1-20)? It doesn’t seem like that would be necessary.
Unfortunately, yes. The display connector must be disconnected in order for the LCD to be removed, and that can only be done on the back side. Note the dangling connector in the second picture of step 30.
Hi ! I just want to replace my digitiser. Is that possible?
Very detailed explanation, I'm very impressed, now if you could include all of this in the Australian site that would be amazing!
thanks for sharing, really nice and complete…
by,,,yudionline
Hi,
I have a circular crack in the centre of the glass which has slowly expanded due to the frictional force of operating the phone with my finger (finger inadvertently dragging small bits of glass from the edge) , leaving the screen below exposed.
I intend to replace the screen using this comprehensive and detailed guide. Does anyone have any recommendations for cleaning the exposed screen? The screen itself does not have the smoothness of the glass collects dirt easily.
I have isopropyl alcohol, but is this too harsh for the touch sensitive screen?
This is a well written guide up to a point, but seems very redundant at the end. You are advising removing an extremely strong foam adhesive and then replacing it with double sided tape?
How about a guide to reapplying a new coat of foam adhesive? Including a guide to what foam adhesive is used, and where a quality replacement could be found.
This is a premium engineered product, so a guide that can restore it to near factory quality including the waterproofing would be very useful.
It would also be very helpful to have a guide to what kind of screen replacements are available, and where to find a proper ‘aftermarket’ replacement and not a cheap variant.
Hello Shamsung,
While quality adhesives are very important in sealing the phone, there is unfortunately no reliable way for users to “waterproof” their repairs (other than using a waterproof case). Repair shops may be able to improve the resistance by sealing the phone using special pressure and temperature presses, but even then, they would not guarantee water resistance.
There are links to adhesive guides in the steps, which will show how to apply the proper adhesives to the phone.
In general, I would suggest not to trust in the water resistance rating. The phones are tested when they are brand new, and adhesives break down due to wear and tear. There is a reason why companies will not cover water-damaged phones in their warranties.
Hi,
Is it possible to connect a S7 Edge screen on a S7 (G930F) just a moment in order to recover data to my computer ?
I do not want to assemble it, but connect the screen somme minutes.
Thanks.
Bonjour
Est-ce possible de brancher l’écran d’un Galaxy S7 Edge sur un Galaxy S7 en ne branchant que la nappe, sans essayer d’assembler le tout. L’idée étant juste de faire la manipulation une heure, le temps de récupérer les données.
Merci :)
Can you remove the display assembly without breaking it?
I need to access the digitizer flex but i dont know if the display is reuseable if you remove it.
You can theoretically remove it without breaking it, but there is a significant chance of damage. The curved OLED display is very prone to damage as you try to pry it off the frame.
Can you do this to a working display without it breaking in the process?
You can theoretically remove it without breaking it, but there is a significant chance of damage. The curved OLED display is very prone to damage as you try to pry it off the frame.
Nice Guide can can we remove line from screen i got pink link in set
Hello,
I can no longer charge my S7 Edge with the cable.
This problem suddenly appeared.
Perhaps this is due to a failure of the charging connector.
Do you think wireless charging would be a solution?
Because the wireless charging coil is connected to the motherboard, not directly to the charging connector.
In this case, the charging connector would be useless for charging (it is also almost impossible to be replaced due to the display glue).
Thanks
You are right! Your connector is most likely worn out, so wireless charging is definitely a good workaround.
Hey (Thanks for a very good guide)
I tried replacing the screen assembly on my s7 edge. I got a midframe with the screen already installed, so all i had to do was to move the board, batteri and so on. The problem is, when i turn on the phone, the LCD doesn’t work.
Any idea what is wrong?
(i tried whit to new screens with the same result)
try check again all the connections
Daniele Carminati - 4 hours ago
I think i have tried that already :) but thanks for your advice.
nicown -
is the LCD the only thing not working? I mean, does the phone makes sounds and/or vibrates?
Yes.. It seems to be the LCD that is not working. I vibrates when its powered op, and the back and recent buttons lights up. Sorry for my slow reply.
nicown -
I think you may have got a defective replacement screen… Try to get it changed with a new one contacting the seller
I already got another one that i tried :( Do you think i have damaged the connector? (Thanks for your help so far :) )
nicown -
Or you are very unlucky, or you might have a damaged socked on the motherboard… It is still fixable, but you have to do some microsoldering (or bring it to someeone who does it)
Thank you, excellent guide and toolkit (essentials)! New display, new battery, new home button (finally working after 4.5+ years)… feels like a new phone!