跳转到主内容

拆解DualShock 4 主板组件

你所需要的

  1. 拆解DualShock 4 主板组件, 拆解DualShock 4控制器: 步骤 1 中的图像 1,1
    • 使用Phillips #00 螺丝刀移除四颗6.0mm固定后面板的螺丝。

    • 切勿使用强力来松开螺丝,否则会造成螺纹的永久性损坏,从而导致无法拆卸手柄。

  2. 拆解DualShock 4 主板组件: 步骤 2 中的图像 1,3 拆解DualShock 4 主板组件: 步骤 2 中的图像 2,3 拆解DualShock 4 主板组件: 步骤 2 中的图像 3,3
    • 左肩处开始

    • 将撬棒插入左肩来撬开一个开口

    • 在开口处滑动来打开更多的空间

    • 取下撬棒,打开手柄壳。

    • 右肩重复这些步骤。

  3. 拆解DualShock 4 主板组件: 步骤 3 中的图像 1,3 拆解DualShock 4 主板组件: 步骤 3 中的图像 2,3 拆解DualShock 4 主板组件: 步骤 3 中的图像 3,3
    • 将一个撬棒楔入壳体来打开以下按钮附近的卡扣:

    • Share键

    • Options键

    • 将控制器塑料外壳分开,注意两者依然通过排线连接。

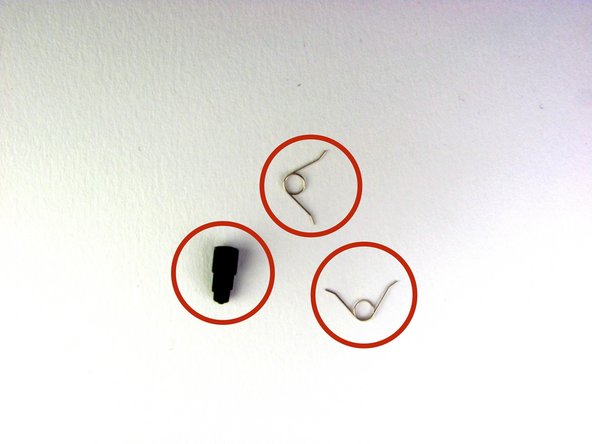
    • 3个小模块经常从框架中跑出,为了避免损失,请保持工作台的干净整洁。

    • 2个触发弹簧

    • 1个灰色复位按钮扩展

  4. 拆解DualShock 4 主板组件, 拆解DualShock 4 主板组件: 步骤 4 中的图像 1,1
    • 用十字#00螺丝刀拆下电池固定器下面的单个6.0 mm十字螺丝。

    • 切勿用力拆卸螺丝,因为它可能导致螺纹的永久性损坏,使得螺丝变得不可能拆卸。

  5. 拆解DualShock 4 主板组件: 步骤 5 中的图像 1,2 拆解DualShock 4 主板组件: 步骤 5 中的图像 2,2
    • 使用镊子轻轻取下连接到主板的触摸板排线。 触摸板排线通过连接器连接到主板,该连接器需要翻转来松开。 在重新组装时,为了重新连接排线,塑料托盘需要从主板上轻轻取出,并且将翻盖锁翻开。

  6. 拆解DualShock 4 主板组件: 步骤 6 中的图像 1,2 拆解DualShock 4 主板组件: 步骤 6 中的图像 2,2
    • 小心地从前盖拆下主板组件。

    • 振动电机十分松动的与转相连。 在两端支撑,以便分离。

    • 当移除主板组件时,切勿将外壳上下倾倒,按键可能会掉出来。

  7. 拆解DualShock 4 主板组件, 拆解完成: 步骤 7 中的图像 1,3 拆解DualShock 4 主板组件, 拆解完成: 步骤 7 中的图像 2,3 拆解DualShock 4 主板组件, 拆解完成: 步骤 7 中的图像 3,3
    • 成功的拆解了控制器,将呈现以下三个部份。

    • 主板组件

    • 前外壳

    • 后外壳

结论

要重新组装您的设备,请按照本指南的相反顺序进行操作。

145等其他人完成本指南。

由衷感谢以下译者:

en zh

100%

Leon赵国鑫正在帮助我们修复这个世界! 您也想加入吗?
开始翻译 ›

Maaz Hussaini

于01/21/14注册

5,831 声望

创作了3篇指南

团队

Cal Poly, Team 6-21, Maness Winter 2014 Cal Poly, Team 6-21, Maness Winter 2014 的会员

CPSU-MANESS-W14S6G21

4 名成员

创作了40篇指南

20条评论

So my controller decided to stop charging (still stayed on until the battery completely dained) a couple weeks ago so I bought a new charging port and ribbon and replaced it put it all back together just for it to work the same not charging but on so I figured maybe it was the battery all along but this time I took my other new controller apart so I could test the battery by connecting it to the new controller to see if it will take charge which they would take charge on the new controller but when I took the new ones and put it in the old on it still wouldn't take charge I have no Idea what else to do everything else works it just won't charge even the light is still on but if I keep it connected to a USB cable it will stay on since the battery was dead but the battery status remains the same.

Archie Roberta - 回复

Same here except mine won't even work while plugged in. It just turns on and dies

Jonah Roeger -

there is a new and different version out (looks the same) different internals - anyone got one to show us? (Model = CUH-ZCT1E?)

Russ - 回复

How do you put back the touchpad? That $@$* Is a &&^&^$^ paradox.

Modern Retro Gaming - 回复

The top of the touchpad that has the groove has to be inserted at the part where the bottom of the touchpad is normally. Then you you move it up and you can wiggle it through the arc. After that it fits snugly like it supposed to.

Rick -

添加评论

浏览统计数据:

过去 24 小时: 112

过去 7 天: 871

过去 30 天: 4,188

总计 664,735