跳转到主内容

任天堂 Switch Lite 电池更换

你所需要的

  1. 任天堂  Switch Lite 电池更换, 移除后面板螺丝: 步骤 1 中的图像 1,1
    在这个步骤中使用的工具:
    Magnetic Project Mat
    $19.95
    购买
    • 开始此修复之前,请确保设备已完全关闭。

    • 使用Y00螺丝刀卸下固定后面板的四颗6.3毫米长的螺丝。

    • 在整个维修过程中,请保管好每一个螺丝 并确保它能够正确的回到原来的位置上

  2. 任天堂  Switch Lite 电池更换, 移除顶盖和底盖: 步骤 2 中的图像 1,2 任天堂  Switch Lite 电池更换, 移除顶盖和底盖: 步骤 2 中的图像 2,2
    • 用 JIS 000 螺丝刀或官方 iFixit PH 000 螺丝刀卸下固定后面板的螺丝:

    • 设备顶部的两个3.6毫米长的螺丝

    • 设备底部的两个3.6毫米长的螺丝

    • 为防止这些拧的很紧的螺丝滑丝,请向下用力,缓慢操作,如果螺钉无法卸下,请尝试使用不同的螺丝刀。

  3. 任天堂  Switch Lite 电池更换, 释放固定后面板的夹扣: 步骤 3 中的图像 1,2 任天堂  Switch Lite 电池更换, 释放固定后面板的夹扣: 步骤 3 中的图像 2,2
    • 将撬棒平端插入设备底部的左扬声器网罩中。

    • 扭转撬棒以松开固定后面板的夹扣。

    • 为避免损坏扬声器模块,请避免插入过深。

  4. 任天堂  Switch Lite 电池更换, 继续打开夹扣: 步骤 4 中的图像 1,2 任天堂  Switch Lite 电池更换, 继续打开夹扣: 步骤 4 中的图像 2,2
    • 向左下角滑动撬棒,来松开设备左侧的夹扣。

  5. 任天堂  Switch Lite 电池更换, 扭动以松开夹扣: 步骤 5 中的图像 1,2 任天堂  Switch Lite 电池更换, 扭动以松开夹扣: 步骤 5 中的图像 2,2
    • 将撬棒插入设备底部的右扬声器网罩中。

    • 扭转撬棒以松开夹扣。

    • 为避免损坏扬声器模块,请避免插入过深。

  6. 任天堂  Switch Lite 电池更换, 滑动并撬开机器的边角处: 步骤 6 中的图像 1,2 任天堂  Switch Lite 电池更换, 滑动并撬开机器的边角处: 步骤 6 中的图像 2,2
    • 向右下角滑动撬棒,以打开设备右侧的夹扣。

  7. 任天堂  Switch Lite 电池更换: 步骤 7 中的图像 1,2 任天堂  Switch Lite 电池更换: 步骤 7 中的图像 2,2
    • 继续沿着设备顶部的间隙滑动撬棒,以释放夹扣。

  8. 任天堂  Switch Lite 电池更换, 移除后面板: 步骤 8 中的图像 1,3 任天堂  Switch Lite 电池更换, 移除后面板: 步骤 8 中的图像 2,3 任天堂  Switch Lite 电池更换, 移除后面板: 步骤 8 中的图像 3,3
    • 提起后面板的底部边缘,使其像一本书一样打开。

    • 卸下后面板。

  9. 任天堂  Switch Lite 电池更换, 移除屏蔽板: 步骤 9 中的图像 1,1
    • 使用 JIS 000 螺丝刀或官方 iFixit PH 000 螺丝刀卸下以下四颗螺丝:

    • 三颗3.1 mm 螺丝

    • 一颗4.5 mm螺丝

  10. 任天堂  Switch Lite 电池更换: 步骤 10 中的图像 1,3 任天堂  Switch Lite 电池更换: 步骤 10 中的图像 2,3 任天堂  Switch Lite 电池更换: 步骤 10 中的图像 3,3
    • 用撬棒或手指将屏蔽板向上提起并从设备中取出。

    • 你可能会感到有些抵触。这是正常现象,因为屏蔽板会通过导热膏略微粘结到散热器上。

    • 拆下屏蔽板。

    • 使用异丙醇和超细纤维布清除屏蔽板和散热器上的旧导热膏。重新组装前,在散热器上涂上新的导热膏。

  11. 任天堂  Switch Lite 电池更换, 断开电池: 步骤 11 中的图像 1,2 任天堂  Switch Lite 电池更换, 断开电池: 步骤 11 中的图像 2,2
    • 使用打开工具或指甲翻转主板互连电缆ZIF接口上的小铰链锁片。

  12. 任天堂  Switch Lite 电池更换: 步骤 12 中的图像 1,2 任天堂  Switch Lite 电池更换: 步骤 12 中的图像 2,2
    • 不要使用金属镊子!一些修理者指出,金属镊子会使排线/接口短路。使用尼龙头或陶瓷头镊子可能更安全。

    • 使用镊子将排线从主板上的接口上取下。

  13. 任天堂  Switch Lite 电池更换: 步骤 13 中的图像 1,2 任天堂  Switch Lite 电池更换: 步骤 13 中的图像 2,2
    • 用撬棒尖将电池连接器直接向上撬出主板上的插座。

  14. 任天堂  Switch Lite 电池更换, 移除电池: 步骤 14 中的图像 1,2 任天堂  Switch Lite 电池更换, 移除电池: 步骤 14 中的图像 2,2
    • 在电池凹槽的顶部边缘上滴几滴脱胶剂或高浓度(90%或更高)的异丙醇,以减弱粘合剂粘度。

    • 如果你使用的是脱胶剂,请首先执行以下准备步骤。

  15. 任天堂  Switch Lite 电池更换: 步骤 15 中的图像 1,2 任天堂  Switch Lite 电池更换: 步骤 15 中的图像 2,2
    • 向上倾斜设备的顶部边缘,以使异丙醇在电池下方正常工作。

    • 保持1-2分钟,以使异丙醇有时间变弱粘合剂。

  16. 任天堂  Switch Lite 电池更换: 步骤 16 中的图像 1,3 任天堂  Switch Lite 电池更换: 步骤 16 中的图像 2,3 任天堂  Switch Lite 电池更换: 步骤 16 中的图像 3,3
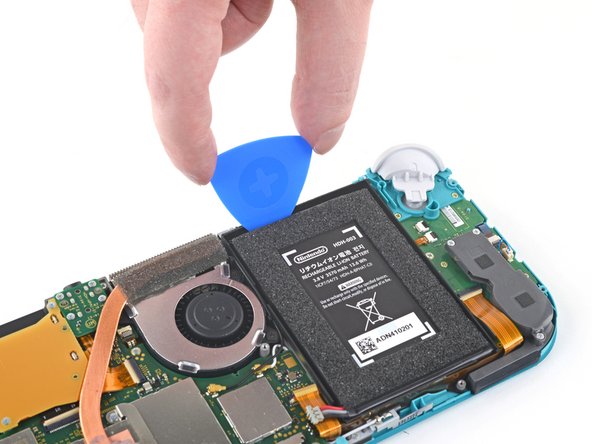
    • 在电池和电池槽壁之间的间隙中插入一个三角撬片。

    • 仔细挖开电池下方的开口尖的尖端,然后将其沿边缘滑动,以开始切割粘合剂。

    • 注意不要用工具刺穿或弯曲电池——刺穿或弯曲的电池可能会泄漏危险的化学物质或引起热事件。

  17. 任天堂  Switch Lite 电池更换: 步骤 17 中的图像 1,2 任天堂  Switch Lite 电池更换: 步骤 17 中的图像 2,2
    • 将三角撬片留在原处,并在电池槽内再滴几滴脱胶剂或异丙醇。

    • 不要挤太多滴,否则液体有可能会流入下方的显示屏中。

    • 向上倾斜设备的顶部边缘,然后等待1-2分钟,以使异丙醇削弱粘合剂。

    • 继续沿着电池的顶部边缘打开撬片,在下面切更多的粘合剂。

  18. 任天堂  Switch Lite 电池更换: 步骤 18 中的图像 1,3 任天堂  Switch Lite 电池更换: 步骤 18 中的图像 2,3 任天堂  Switch Lite 电池更换: 步骤 18 中的图像 3,3
    在这个步骤中使用的工具:
    Plastic Cards
    $2.99
    购买
    • 一旦有足够的空间,将塑胶维修卡插入电池下方,然后缓慢撬起电池。

    • 如果撬动困难,则可能需要使用更多的异丙醇。

    • 撬起时请勿弯曲电池。

    • 取出电池。

    • 取出电池后,请勿重复使用,因为这样做有潜在的安全隐患。更换新电池。

  19. 任天堂  Switch Lite 电池更换: 步骤 19 中的图像 1,1
    在这个步骤中使用的工具:
    Microfiber Cleaning Cloths
    $3.99
    购买
    • 在安装新电池之前,请使用去粘剂或异丙醇和超细纤维布清除残留在电池槽中的所有残留粘合剂。

    • 如果你的新电池没有预安装的粘合剂,请按照本指南在电池底部安装预切的粘合剂。

结论

要重新组装设备,请按照逆序进行操作。

为了获得最佳性能,请在完成本指南后校准你新安装的电池

将你的电子垃圾带到R2或e-Stewards认证回收商

维修没有按计划进行吗?尝试一些基本的故障排除,或向我们的社区寻求帮助。

35等其他人完成本指南。

由衷感谢以下译者:

en zh

100%

这些译者帮助我们修补全世界! 您也想加入吗?
开始翻译 ›

Craig Lloyd

于02/10/16注册

35,377 声望

创作了82篇指南

20条评论

Hello!

I am preparing to repair my daughters nintendo switch light. It has stopped charging out of no where. I have all the tools, I just can't find the battery anywhere. Where would you recommend buying it from?

Aryana Lograsso - 回复

If you are still looking Ifixit sells one themselves Nintendo Switch Lite Battery

Edward hett -

Thanks for the guide. Battery replacement kits are now available on Amazon: https://www.amazon.com/Nintendo-HDH-001-... (they weren’t in November! I was also looking for this during that time)

Unfortunately, the battery was much harder to remove than I expected. I did use a lot of isopropyl alcohol, but the adhesive they use really was giving me a lot of trouble. I should’ve wisened up and googled other adhesive removal methods or tried a new approach other than prying with the spudgers.

Well, now the LCD now has what looks like pressure damage in the bottom left where I’d imagine a lot of the prying pressure went. It is much more noticeable when the screen goes all-white, and not too bad with darker colors.

I don’t blame iFixit for my mistake of course, and it is really disappointing that Nintendo used the amount of adhesive that they did. But I hope this comment can serve as a warning to others attempting this repair to be more gentle even if it’s refusing to come off.

vmgm - 回复

Yikes! Sorry to hear this. How did you pry with the spudger exactly? If you kept it around the top edge of the battery well then I would assume it wouldn’t damage the screen, but if you inserted the end of the spudger deeper in the battery well and used that point as the fulcrum, then I could see that putting a lot of pressure on the back of the LCD.

Craig Lloyd -

@craiglloyd I did an embarrassing amount of spudger prying pretty much everywhere along the top/bottom of the battery, I actually broke a few spudger tips in the process so that might reveal something about my approach…

But, I’m starting to think it may not be LCD damage after all, but rather some isopropyl alcohol caught behind the screen– During my prying, the Switch case was getting pretty heavily warped, so maybe some of the alcohol (that I definitely used in excess) slipped in and got sandwiched under the screen? I started to notice this since the blotches seem like they’ve moved over time. Here’s an image of the screen now https://imgur.com/DjYmFnJ (and the dark gray blotch along the leftside isn’t a shadow, white spots in bottom left I thought were pressure damage)

It’s still very usable / not noticeable on black colors and thanks again for the guide! I can give the screen more time to see if it improves at all, or maybe try going back in and trying to see it is trapped alcohol that can be released

vmgm -

添加评论

浏览统计数据:

过去 24 小时: 103

过去 7 天: 864

过去 30 天: 4,380

总计 158,172