跳转到主内容

三星Galaxy S10+ 更换后盖

你所需要的

  1. 三星Galaxy S10+ 更换后盖, 加热后盖: 步骤 1 中的图像 1,3 三星Galaxy S10+ 更换后盖, 加热后盖: 步骤 1 中的图像 2,3 三星Galaxy S10+ 更换后盖, 加热后盖: 步骤 1 中的图像 3,3
    • 在开始之前拔下电源插头并关闭电源。

    • 加热iOpener并将其涂在后盖的右边缘两分钟。

    • 也可以使用吹风机、热风枪或热板,但要注意不要使手机过热 —— 显示器和内部电池都易受热损坏。

    • 等待时,请查看拆下的后盖的图像,并记下粘合剂的位置。

  2. 三星Galaxy S10+ 更换后盖, 制造一个打开的空隙: 步骤 2 中的图像 1,3 三星Galaxy S10+ 更换后盖, 制造一个打开的空隙: 步骤 2 中的图像 2,3 三星Galaxy S10+ 更换后盖, 制造一个打开的空隙: 步骤 2 中的图像 3,3
    • 在手机背面使用一个吸盘,尽可能靠近右边缘的中心(粘合剂最窄的地方)。

    • 用强力,稳定的力拉动吸盘,在后盖和框架之间形成间隙。
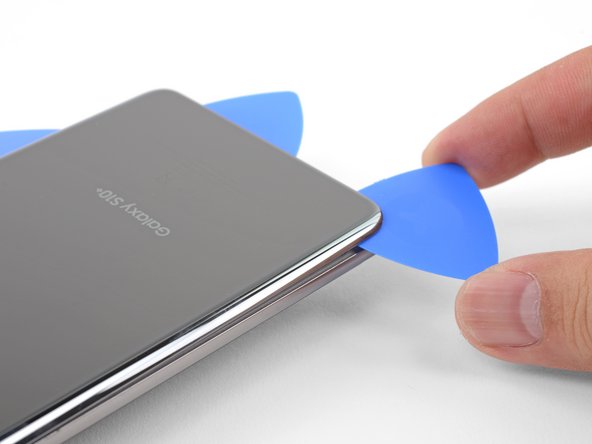
    • 将开口三角撬片的尖端插入间隙。

    • 由于很紧,这可能需要多次尝试。

    • 如果你在撬开时遇到困难,最好的办法是向边缘施加更多热量并再次尝试上一步。

    • 您可以尝试在接缝中涂几滴高浓度(超过90%)的异丙醇,以帮助软化粘合剂。

    • 请勿过度用力使用三角撬片,否则可能会使后盖玻璃破裂。

    I can’t get the back cover to seperate, I’ve been trying for several hours now, it just stays with the rest of the phone. I’m fairly certain my phone is hot enough as I touched the back and I can’t place my hand there for more than a few seconds at a time. It’s just not coming off and I’m so frustrated! Any help?

    fiona Xie - 回复

    Hi Fiona,

    The back adhesive can be very difficult! Have you tried the suggestions in step 3? It may take a few heat cycles to weaken the adhesive. You can use a hairdryer to heat it pretty hot along the edge.

    Arthur Shi -

    My back cover glass is shattered but not coming apart! What do I do?

    Otto Plutoonium - 回复

    I was able to use my fingernails first (with the assistance of the suction cup) to get in the gap, and then, with my fingernails still in the gap there was enough room to put in the pick. I couldn't get the pick in there by itself even after 10 minutes of warming and suction cup prying... but my fingernails could get in, and then I used them to hold the space open and pull a little more so the pick could be inserted.

    Alan Miller - 回复

  3. 三星Galaxy S10+ 更换后盖: 步骤 3 中的图像 1,3 三星Galaxy S10+ 更换后盖: 步骤 3 中的图像 2,3 三星Galaxy S10+ 更换后盖: 步骤 3 中的图像 3,3
    • 将手机的加热右边缘放在约0.5英寸(13毫米)厚的物体上。这使手机成为打开工具的角度。

    • 用手指支撑手机的左边缘,这样手机就不会滑动。用坚固的压力拉动吸盘。

    • 将打开工具的边缘按入后盖和框架之间的接缝中。

    • 沿着接缝来回几次滑动撬棒工具。

  4. 三星Galaxy S10+ 更换后盖, 划开粘合剂: 步骤 4 中的图像 1,3 三星Galaxy S10+ 更换后盖, 划开粘合剂: 步骤 4 中的图像 2,3 三星Galaxy S10+ 更换后盖, 划开粘合剂: 步骤 4 中的图像 3,3
    • 沿着手机边缘滑动三角撬片,切开粘合剂。

    • 在施加热量之前,不要尝试切割保持角落的粘合剂。如果你这样做,你可能会破坏后盖。

    • 在接缝处留下一个三角撬片,以防止粘合剂重新密封。

  5. 三星Galaxy S10+ 更换后盖: 步骤 5 中的图像 1,1
    • 将加热的 iOpener 放在手机底部边缘两分钟。

  6. 三星Galaxy S10+ 更换后盖: 步骤 6 中的图像 1,2 三星Galaxy S10+ 更换后盖: 步骤 6 中的图像 2,2
    • 将三角撬片插入右下角附近的右边缘。

    • 小心翼翼地将三角撬片放在拐角处。沿着底边和左下角继续切割。

    • 如果感觉切割困难,请在继续之前重新加热边缘。

    • 在接缝处留下三角撬片,以防止粘合剂重新密封。

  7. 三星Galaxy S10+ 更换后盖: 步骤 7 中的图像 1,3 三星Galaxy S10+ 更换后盖: 步骤 7 中的图像 2,3 三星Galaxy S10+ 更换后盖: 步骤 7 中的图像 3,3
    • 继续加热并切割手机的剩余边缘。

    • 切割角落时,请确保角落被彻底加热。

  8. 三星Galaxy S10+ 更换后盖: 步骤 8 中的图像 1,3 三星Galaxy S10+ 更换后盖: 步骤 8 中的图像 2,3 三星Galaxy S10+ 更换后盖: 步骤 8 中的图像 3,3
    • 在手机上划开之后,扭动其中一个边缘的三角撬片,以帮助将后盖与框架分开。

    • 慢慢抬起后盖。使用三角撬片切割任何剩余的粘合剂。

    • 取下后盖。

    • 在重新安装后盖之前,务必清除框架上的所有粘合剂残留物。在重新组装过程中,在将后盖密封到位之前,这是打开手机电源并测试所有功能的号时机。在继续工作之前,请务必将手机完全重新打开。

    • 请按照本指南重新安装后盖,转移并安装相机挡板,并更换粘合剂。

结论

请按逆序重组你的设备。

完成维修后,点击此链接查看测试维修的指南。

26等其他人完成本指南。

由衷感谢以下译者:

en zh

100%

这些译者帮助我们修补全世界! 您也想加入吗?
开始翻译 ›

Arthur Shi

于01/03/18注册

252,789 声望

创作了526篇指南

团队

iFixit iFixit 的会员

Staff

135 名成员

创作了16,817篇指南

7条评论

Good guide, pretty easy to follow along

Virginia Borrelli - 回复

si le cambio la tapa trasera a mi s10 plus deja de funcionar bajo el agua?

basilio.paredes2020 - 回复

That’s correct. The phone will not be water resistant.

Eso es correcto. El teléfono no será resistente al agua.

Arthur Shi -

then How can I keep it water-resistant?

Jeet z -

Easy to follow guide. The iOpener worked better than a hair dryer for even heat, but it took more than I thought it would to get the back cover off.

Michael - 回复

i used a sock filled with rice in microwave for 4 mins and set it on the cell with a piece of clear plastic for 5 mins, back was off with 1 pick in 30 seconds

Kenneth PECK - 回复

can super glue be used

steve allen - 回复

添加评论

浏览统计数据:

过去 24 小时: 12

过去 7 天: 70

过去 30 天: 393

总计 51,861