简介
使用本指南替换Samsung Galaxy S9上破裂或损坏的显示屏。
在拆卸手机之前,请将电池放电至25%以下。如果意外被刺破,电池会着火和/或爆炸,但如果放电,发生这种情况的可能性要低得多。
注意:本指南指示你只更换显示屏,同时保留原始框架,主板和电池。但是,这款手机的一些替换屏幕预先安装在一个新的框架(又名机箱)中,这需要一个非常不同的程序 —— 移植手机内部并安装新电池。在开始本指南之前,请确保你有正确的配件。
本指南涉及拆除后玻璃盖:你需要更换粘合剂才能将后盖重新连接到手机上。如果你的替换显示器没有附带粘合剂,请使用强大的双面胶带,例如Tesa 61395来保护它。
打开三星Galaxy S9将“损坏设备上的防水密封”。如果你不更换胶粘剂密封圈,你的手机将“正常运行”,但将会“失去防水功能”。
如果框架损坏或弯曲,更换它是很重要的,否则新屏幕可能无法正确安装并且可能因压力不均而受损。
将显示屏与框架分开的过程通常会破坏显示屏,因此除非你打算更换显示屏,否则请不要按照本指南进行操作。
你所需要的
-
-
在以下步骤中,你将切割固定后盖的粘合剂。
-
你将在所示区域中切割粘合剂:
-
粘合剂厚的区域
-
粘合剂薄的区域
-
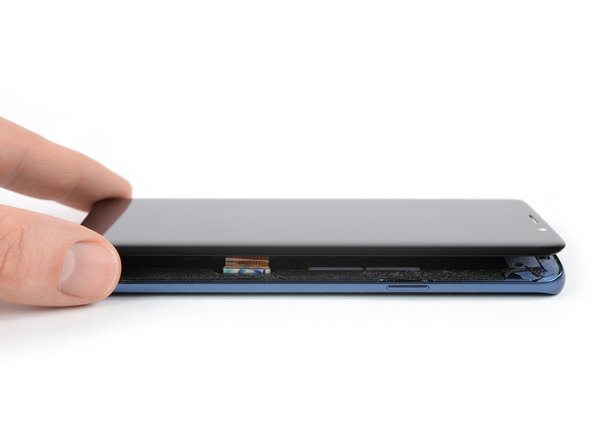
避免在此区域做撬动或滑动之类的操作,以保护指纹传感器柔性电缆。
I ran into a chunk of adhesive that was in the red zone right next to where the connector was. Be careful, cut slow, I managed to make it through my working my way through things that felt like foam.
-
-
-
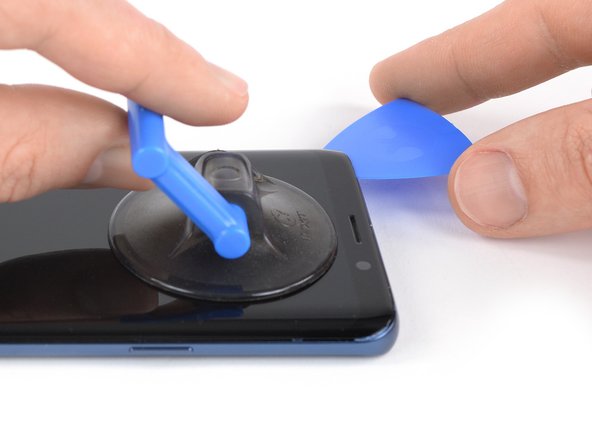
将吸盘按到后盖上。
-
用吸盘提起后盖的底边,打开后盖和框架之间的微小间隙。
-
在你打开的间隙中插入一个三角撬片,然后将其滑动到右下角。
-
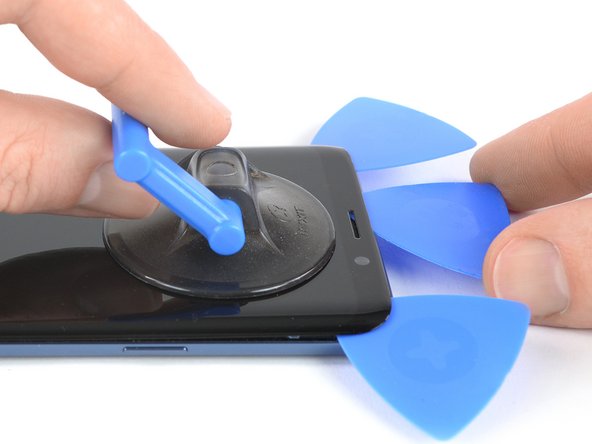
插入第二个三角撬片并将其滑动到左下角。
-
插入第三个三角撬片,以防止粘合剂在其余的拆卸过程中重新密封。
The manufacturer obviously doesn't want owners to replace the battery, or they would have a simple method like they did in the past !!! They would rather have you throw it away and replace the phone !!!!
Well. I guess so!
I was so looking forward to doing this.
What a shame this type of manufacturing occurs!
😭
From a do it yourself person.
-
-
-
-
拧下八个4mm Philips #00螺丝。
I think the #000 fits better!
The second and fourth screws on the bottom row are a little shorter at 2mm ( I measure the others as 3mm). Worth some care to put the screws back in the same holes as they came from. (SM-G960U)
Will Smart - 回复
Hi Will,
thank you for mentioning! On our model the “SM-G960XU” all screws have the same length (4 mm). However this might differ between different models and is definitely something to keep an eye on during repairs.
-
-
-
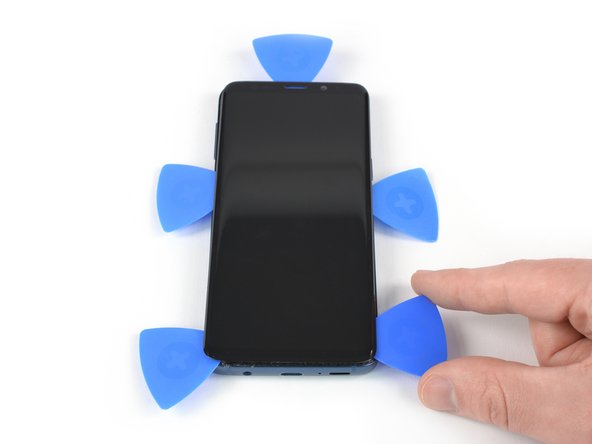
一旦屏幕摸起来变暖了,请在手机的上边缘使用吸盘。
-
在间隙中插入一个三角撬片,然后将粘合剂滑动到左上角,开始切割粘合剂。
-


将新的更换配件与原始配件进行比较 —— 在安装之前,你可能需要转移剩余配件或从新配件上移除粘合剂背衬。
确保新屏幕安全的最佳方法是使用一张定制的双面胶带。将胶带贴在屏幕背面,然后小心地将显示屏电缆穿过框架。对齐屏幕并将其按入到位。
要重新组装你的设备,请按相反顺序执行上述步骤。
如果可能,请在安装新胶粘剂并重新密封手机之前打开手机并测试维修。
将你的电子垃圾带到R2或e-Stewards认证的回收商。
维修没有按计划进行?查看我们的Answers社区以获取故障排除帮助。
将新的更换配件与原始配件进行比较 —— 在安装之前,你可能需要转移剩余配件或从新配件上移除粘合剂背衬。
确保新屏幕安全的最佳方法是使用一张定制的双面胶带。将胶带贴在屏幕背面,然后小心地将显示屏电缆穿过框架。对齐屏幕并将其按入到位。
要重新组装你的设备,请按相反顺序执行上述步骤。
如果可能,请在安装新胶粘剂并重新密封手机之前打开手机并测试维修。
将你的电子垃圾带到R2或e-Stewards认证的回收商。
维修没有按计划进行?查看我们的Answers社区以获取故障排除帮助。
75等其他人完成本指南。


5条评论
A bit of guidance on where the adhesive seal goes would be nice. I believe I got it right.
john bromm - 回复
digitizer is stuck to glass, and came apart
I followed the entire guide and still got a black screen of death.
Na het uitvoeren van alle stappen kwam ik een goudfolie tegen achter het scherm. Deze zie ik niet terug in jouw beschrijving. Wat kan ik doen?
Nightmare. Impossible to get the back off so far. Being trying using the iOpener with hair dryer for last 1hr. No chance.
Chris Bunney - 回复
You’re right Chris. I’ve tried on 3 separate occasions now and haven’t been able to budge that back. All that has happened is the pick has taken a piece out of the glass back leaving a rough edge now.
grahamcatto - 回复
it was not easy but doable.
Clinton Stark - 回复
It’s difficult, but the trick I did to get it was to wrap the hot iOpener around a bottom corner, apply the suction cup, then I covered the opener and phone with a paper plate, better insulating the area. Then I set my blow dryer to high heat and low velocity and heated the area under the plate for about a minute. Right after turning off the blower, I took off the plate and pulled the suction cup with a cutter at hand. You’ll hear a bit of a cracking/popping noise when the adhesive is starting to give, just apply a little more force and push the cutter at the seam. This method worked great for me, so good luck and just keep at it — you’ve got this!
Nicholas Weger - 回复
I used nearly boiling water in a storage zip bag on the phone for 10 minutes. I can’t really recommend this method, but thankfully the bag did not leak - an iOpener is probably a much better way to go. Regardless, the bag covered the entire back of the phone, and the phone was too hot to hold, but I still could not get the glass to budge with the suction cup after struggling with it for about an hour and multiple reheats. I ended up epoxying a 2”x2” square of PVC board to the bottom of the cover and built a relatively complex fixture that pulled on the PVC with the turn of a screw while it held down the frame by the edges. After heating the edges up again It did lift the glass enough to get a pick underneath it, but it cracked the glass and it was a pain to slide a pick around the edge while the glass was cracking all the way around. Once I finally got all the glass off, I spent the next 30 minutes (which is what this entire process is supposed to take… what a joke!) cleaning the adhesive off the phone.
drbenton815 - 回复
Heavy Duty Heat Gun from popular discount tool store for the win!
Jesse Meyer - 回复
Well, it is not obvious how to do this. I have no iOpener, but a heat cushion for remedy hurting muscles and sometimes a backpain. It is filled with grain of some kind and it is to be heated in a microwave oven for about 3 minutes. After that I enveloped this cushion round the phone and brewed myself a cup of tea. After ten miutes the phone was warm (almost hot) and I was able to press the tip of a small (very small) knife above the charging port into the connection between the phone body and the backplate. A very small opening emerged slowly (this is the critical point in this process) and I was able to start using the iFixit opening picks. It became obvious to me that the opening picks are too blunt to achive this with them. But after starting carefully with the (very small and very sharp) knife, everything went straight forward. Thou I had to give the phone a second heatpush with my heat cushion before the backplate came loose.
borutberg - 回复
I used my 3D printer heat bed and heated it to 90 Celcius to succeed.
gahute - 回复
It took about 3 minutes on my 90 C printbed to get the first pick in. If the suction cup gives up before the adhesive does, try using some Isopropyl alcohol to clean the back of the phone, and it should stick better. Also, don't apply heat to the screen, just in case that wasn't clear.
Evan Newman -
Used a corn bag (usually used for sore muscles) and incased the phone. It was hot to the touch, but it did the trick. Also needed a knife to have a small enough edge to start prying the back off and get the adhesive to finally pop.
Laurie Hallberg - 回复
Don't Forget Step 0! Turn the phone Off and remove the SIM card tray. just to be safe, I'd recommend making a full backup of your phone onto a micro SD card in case the worst should happen. also, make sure anyone who needs to contact you knows you aren't currently available at your phone number.
Evan Newman - 回复
We went for a hairdryer. Put it on hot, low blow and put the head right up to the corner. Took maybe 5 minutes per corner!
Robert Tomohamat - 回复
Removing the back wasn't too difficult on my phone: several rounds of heating with the iOpener, applying gentle pressure with the suction cup, and eventually a corner lifted up without much force and I could easily slide a pick in. From there it was very straightforward and I had no trouble sliding the picks around and removing the back. The battery removal was much harder in comparison (especially as the iOpener burst when reheating in the microwave for the battery, despite following the time instructions).
Less eWaste - 回复