跳转到主内容
加入维修社区 - 创建账户

No pod required, single serve coffee brewing system with built in frother. Coffee drinks that can be made hot, iced, or other specialties and from a one cup serve to multi-serve. This device can be identified by its model number CF111 30.

Ninja coffee maker suddenly does not recognize the Tea brewing basket

Block Image
Block Image
Block Image

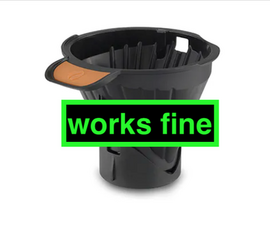
Out of nowhere, my Ninja cp301 (similar to the unit I selected for this post) does not recognize the tea brewing basket. When I place the orange coffee brewing basket in the unit, it works fine.

Steps I’ve taken:

  • “Burped” the unit by turning it upside down and lightly striking it with the palm of my hand.
  • Cleaned the unit with a paper towel. Removed a lot of buildup from where the hot water drips down into the brew basket.
  • Cleaned the tea brew basket and examined it for damage
  • Consulted the owner’s manual for troubleshooting tips

Symptoms:

When I place the tea brewing basket in the unit, the machine’s lights do not indicate “Tea”. Pressing start, on any setting, causes 5 beeps and both the Tea and Coffee light indicators flash. (This is also what happens with no brew basket in the machine)

The coffee brew basket works fine. The machine just suddenly stopped recognizing the tea brew basket for no apparent reason. I had just used the machine to make tea about 3 hours before I noticed the failure.

My question:

How does the machine “know” which basket is inserted? There is something about my tea brew basket that isn’t triggering the proper sensors or something. I doubt running the cleaning function will help, but I am trying that next.

I would greatly appreciate any help or advice on how to get things back in order.

Thanks,

Jason

回答此问题 我也有这个问题

这是一个好问题吗?

得分 4
7条评论

I have the opposite problem. Mine doesn't recognize the coffee filter holder. I even tried a brand new filter holder. So frustrating when all I want is a cup of coffee.

完成的

Tony Rigby, any idea how the unit differentiates between the two baskets? I'm at a loss for answers to that question.

I did find replacement baskets on amazon, but I haven't purchased one. Maybe that's a solution, but I've taken to just using the coffee basket on "rich", 1/2 pot setting, to make tea.

I use 3 bags of Lipton decaffeinated tea (from Sam's Club) and brew into a large plastic "Super Big Gulp" cup. I turn off the hot plate, of course. I just pour that brew into a large plastic tea jug (an empty Peak brand tea jug from Walmart, 1 gallon) and it tastes fine. I don't have a very sophisticated pallette, but it doesn't taste like coffee or anything to me.

Perhaps you can experiment with the tea basket and paper filters and share your results for making coffee? Or if you buy a new basket, I'd love to know if it fixes your issue .

Jason

完成的

Sorry, I forgot you mentioned trying a new filter holder. Did you buy a new basket and filter, or just the "holder", as you mentioned?

完成的

The new filter holder doesn't work. I did run the clean cycle twice also the altitude calibration twice. It seems to be working for now. Time will tell.

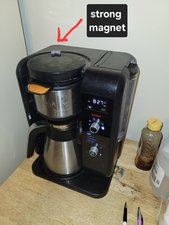
Not sure how it differentiates between the two. The only thing I can see is there's a deeper hole on the bottom of the tea filter holder.

I've spoken to customer service twice a soon to be third. They aren't very much help..

完成的

There are actually quite a few differences in the two filter holders.

完成的

显示更多的2条评论

添加一条评论

10个答案

最有帮助的答案

Tea Basket not recognized. Flashes Coffee Tea. Slight disassembly of Top showed the wires for the Tea magnet switch located in the top of maker pinched. Over time the wires broken internally. Was able to trace both the Tea and Coffee wires (both Red / Black) from the top of maker to the panel. My permanent solution was to place a toggle rocker switch on top shoulder of the maker body , snip the wires leading to the magnet switches in top of maker, and attach to toggle switch. Rocker toggle switch now used to select either Coffee or Tea. Wife says it should have been made like this .. No more magnet issues now or in the future. We simply love the quality of tea this maker produces. They just got carried away in the design.

这个答案有帮助吗?

得分 4

3条评论:

Lucky wife! I’ll be paying to replace mine with the same issue today.

完成的

I think the wires or the magnetic wire switches are the weak points that are breaking.

Do you have any photos of the process you performed when repairing? I'm about to do this same style of repair, but I'd love to see how you did it and how it turned out in the end.

完成的

Check out my comment below where I show how do fix it the same way.

完成的

添加一条评论

Placing a strong magnet on the top of the machine above the back of the basket will lock it in either coffee or tea mode depending on where you locate it.

这个答案有帮助吗?

得分 3

1条评论:

We noticed a small magnet fell out of our basket which caused read issues. If you find the piece, replace it in the basket, or as mentioned, you can tape a small magnet to the black square area on the basket. See photos. This fixed CP307. https://imgur.com/a/EekC3bd

完成的

添加一条评论

I finally figured out how to hack the failing magnet. I placed a strong magnet on top of the coffee maker in the place where the coffee magnet would be (see picture).

Block Image

这个答案有帮助吗?

得分 2

1条评论:

The magnet hack fixed my ninja coffee/tea lite staying on.

Thanks William

完成的

添加一条评论

You do not know how long I looked for mechanical switches. Didn't think to check for magnetic ones. This is brilliant. Lets me reuse pieces from other types of Ninja coffee makers so I can always have one in the dishwasher and one in the coffee pot. Just keep a magnet by the machine.

这个答案有帮助吗?

得分 1
添加一条评论

Sorry to hear that. Been working perfectly for me since I posted to this thread. I switch to a different basket every other week so use this often. The magnet I use happens to be very strong. Wonder if the strength of the magnet matters.

这个答案有帮助吗?

得分 1
添加一条评论

I finally found a fix!!! Buy a new coffee maker and throw the old one in the dumpster.

这个答案有帮助吗?

得分 0

3条评论:

Errr, the magnet trick works perfectly.

完成的

Not for me. It switches to the tea settings, but the “Tea” display does not come on, so I can’t use it. Very frustrating.

完成的

Yup, the magnet trick does not always fix it. It worked for a day or so, and now the coffee light wont come on at all. I can switch it to tea mode with a magnet but it will not display “coffee” any longer and it blinks “coffee/tea” 3 times when i attempt to brew. Just a heads up.

完成的

添加一条评论

The magnet trick is great, until it’s not. Fixed mine for a day or so, and now acts like the magnetic switch isn’t working properly. I can switch to tea mode just fine with the magnet, but i can not switch it back to coffee no matter what i do. I can even get the display to not say “tea”, but it’s blank and doesn’t display “coffee” either and when i attempt to brew it blinks “coffee/tea” 3 times and then nothing happens. Just a heads up for everyone thinking that magnet trick is some be all end all fix. It’s not at all.

这个答案有帮助吗?

得分 0

1条评论:

The magnet 'fix' has been working well for me the past several weeks. I use a rather large magnet (5 ounces) so that might make a difference.

完成的

添加一条评论

Buy a new coffee filter holder from ninja for $15. It solved my problem.

这个答案有帮助吗?

得分 0
添加一条评论

Problem:

My wife's Ninja Hot & Cold Brewed System (CP307) stopped recognizing the coffee basket — no matter how many times I cleaned or reseated it. It looks like the tiny magnet in the basket built / glued into it weakened over time.

Solution:

Taped a small magnet to the top of the brew lid directly over the "coffee" internal sensor. Trial and error moving the magnet around found the coffee spot versus the tea spot. My wife only uses coffee, so taping it in place is a workable MacGyver temporary solution for her. I do like the toggle switch idea mentioned by another and might look into that for the permanent solution.

I did this on a Sunday when the Ninja support line wasn't open. I'll call tomorrow to see if there's a warranty solution. The painters tape doesn't really fit the kitchen aesthetic. :)

Magnet taped on lid in the "Coffee" location.

Block Image

The next pic shows where the weak magnet is on the coffee basket. You can also order a new coffee basket from Ninja (1-877-646-5288).

Block Image

#NinjaCoffee #CP307 #DIYRepair #DIY

这个答案有帮助吗?

得分 0
添加一条评论

I managed to fix my Ninja CP307 (same as CP301 but with insulated steel carafe instead) tonight (took about 4 hours). If you are counting your hours, it's not worth spending the time. If you want the satisfaction of fixing something and stopping waste, it's worth it!

My hunch is, the reason why these break is that the magnetic switches located in the coffee machine's showerhead break. They are probably cheap and very fragile. When you insert either coffee or tea basket, each of those have a magnet on one side or the other and then they are pushed into the machine the magnet magnetizes the magnetic switches turning them on so the machine knows which basket you put in. If you can find replacement magnet switches (something like this would probably work and the repair would be 200x easier lol), I suggest starting there. The below repair is more of a hardened / rugged method of fixing the problem.

Here's what I did to install a physical toggle switch for coffee/tea modes:

  1. Took apart the swing-out basket holder (the thing that you put either the coffee or tea basket into)
    • There are 4 or 5 screws that hold two halves together. You will need a very long but very skinny Phillips PH1. If you don't have one of those, you will end up drilling out the holes where the screws are very dumbly recessed.
    • BE VERY CAREFUL to not lose the spring that goes in the basket holder. It's what lets the basket click into open or close position. As soon as you take this apart, it will fall out. My recommendation is to hot glue a very tiny tab on this spring and reinstall it so that you do not lose it while working on this project. Picture:
Block Image
  • The bottom ring also comes off in this step. It's connected to the basket holder with a small spring. This is pretty easy to take off and put back on when you're ready to reassemble.
  • Remove the pin that connects the swing arm to the swing-out basket holder
    • This was super difficult. You can either use an awl or a very skinny long punch. I used an awl. It was not easy because the basket cannot really swing out much, and there is basically no clearance to get the tool in. You really have to manhandle it. Please someone chime in if they were able to find a better method here.
  • Drill out an access hole for the pin to slide back in during the reassembly steps
    • As you know now, getting the pin out was difficult. Getting it back in at the end is a Manhattan Project. To make it easier, I drilled a big hole and cut off part of the plastic on one of the halves so that the pin can be held by my two fingers and slid back thru the half, the swing-arm, the holder basket, and the swing-arm again. Picture:
Block Image
  1. Remove the screws (6 I think) that hold the showerhead in
    • You have to pull it back pretty hard to get the tube to release. It will feel like you are breaking it nearly. Be careful to not rip it out too hard as there are some wires that we will get to.
  2. Remove the magnetic switches in the showerhead and snip off the wires as close as you can to the switch to preserve wire length
    • I believe these were glued to the showerhead. You can pry them off. There are 4 wires in total.
  3. Drill a hole on the right side of the showerhead assembly for the wires to go thru
    • NOTE: This is flipped upside down. Make sure you drill it on the correct side. The hole I drilled out ended up being much bigger than the picture, but this is where it needs to be drilled.
Block Image
  1. Strip the 4 wires with a wire stripper about 3/4 in
    • Slip some heat shrink tubing onto the wires.
    • Connect 6.5 in of similar gauge wire (do not exceed the gauge; we want the wires to be very flexible and thin, otherwise they will get in the way in a future step) to these and shrink the tubing over your connections.
    • Using a paint marker, mark each set of wires with their own color (ex: the coffee side yellow, the tea side purple). This will be useful in the next step.
    • Strip the extended wires too about 3/4 in.
  2. Run these wires thru the hole you drilled in the showerhead
  3. Cut out a hole centered above the clock display on the machine using a Dremel rotary tool just big enough to install a small DPDT switch
    • Here's where I cut mine:
Block Image
  • Here's the type of switch you need:
Block Image
  1. Using a drill with a very long drill bit or a Dremel / rotary tool with a very small drill bit, cut a hole about 1/2 in wide and 1/3 in tall in the upper-right edge where the top-left of the machine and the top (where the showerhead would be) connect
    • This is where you will run the wires thru.
    • Here's where I cut mine (you can probably cut it in a better spot so the hole is not visible in the end; I ended up covering some of the exposed hole with black silicone):
Block Image
  1. Fish the wires that you extended thru this hole and out the hole above the clock
  2. Connect the wires to the DPDT switch like this:
    • Switch diagram:
      [ 1 ] [ 2 ] [ 3 ]
      [ 4 ] [ 5 ] [ 6 ]
    • Coffee red → pin 2
    • Coffee black → pin 5
    • Tea red → pin 1
    • Tea black → pin 4
    • Jumper pin 3 → pin 6
    • Solder the wires to the switch so they don't come off in the future.
    • Use hot glue to seal the connections / wires (to be waterproof).
  3. Turn on the machine and test the switch
    • Ensure both COFFEE and TEA modes light up.
    • Turn off the machine once confirmed.
  4. Insert the switch into the hole you carved out
    • Put a tiny bead of silicone all around it.
    • Wipe off excess.
  5. Run the wires thru the channel in the showerhead so they don't get smushed
  6. Reinsert the showerhead and screw it back in (about 6 screws)
  7. Put back together the bottom ring, basket holder, and two halves in this order:
    • Bottom ring goes into basket holder. Connect the spring too (easiest by hand).
    • Basket holder goes in between the two halves, then screw back together (4 or 5 screws).
  8. Reinstall the swing-arm pin
    • With extreme patience and nobody around that you love, work on getting the pin from the swing-arm back into the basket holder assembly.
    • Since you drilled an access hole already, it will be much easier. Take the pin in your fingers, line up the swing-arm and basket holder connector, and slowly position the pin so it goes thru all 4 holes.
    • The top of the pin is textured, so you may need something small like an Allen wrench to push it all the way down due to minimal clearance.
    • This took me about 45 minutes.
    • DO NOT WORK IN AN AREA WHERE YOU CAN EASILY LOSE THIS PIN. You will drop it many times.
  9. Once everything is back together, test the machine by brewing both a cup of coffee and a cup of tea (you deserve them).

Finished product:

Block Image


这个答案有帮助吗?

得分 0
添加一条评论

添加你的答案

Jason Bray 将永远感激不已
浏览统计数据:

过去 24 小时: 10

过去 7 天: 46

过去 30 天: 234

总计 12,912